設定檔
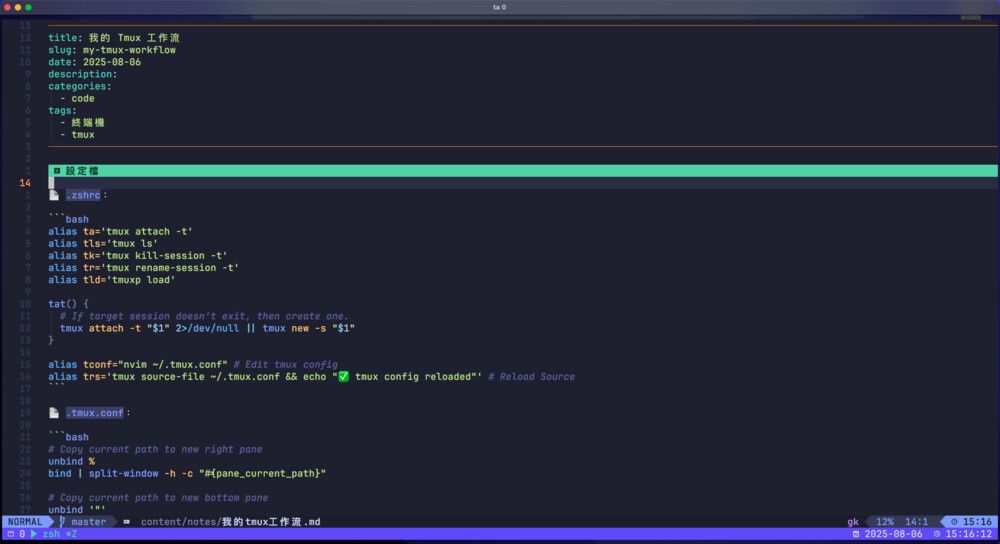
📄 .zshrc:
alias ta='tmux attach -t'
alias tls='tmux ls'
alias tk='tmux kill-session -t'
alias tr='tmux rename-session -t'
alias tld='tmuxp load'

tat() {
  # If target session doesn't exit, then create one.
  tmux attach -t "$1" 2>/dev/null || tmux new -s "$1"
}

alias tconf="nvim ~/.tmux.conf" # Edit tmux config
alias trs='tmux source-file ~/.tmux.conf && echo "✅ tmux config reloaded"' # Reload Source
📄 .tmux.conf:
# Copy current path to new right pane
unbind %
bind | split-window -h -c "#{pane_current_path}"

# Copy current path to new bottom pane
unbind '"'
bind - split-window -v -c "#{pane_current_path}"

bind x kill-pane # kill pane without confirm

# Move around pane
bind h select-pane -L
bind j select-pane -D
bind k select-pane -U
bind l select-pane -R

bind Tab last-window # switch to last-used window

# Copy current path to new window
unbind c
bind c new-window -c "#{pane_current_path}"
修改設定檔
用 tconf 打開 tmux 設定檔,改完之後用 trs 讓設定檔啟用。
💡 Terminal 只是拿來設定字體、顏色等外觀,真正執行程式的都是在裡面的 tmux。
使用情境
以下以我的 blog session 為例。

打開新專案
- 打開 Terminal 之後,用
tls看有哪些 session。 - 輸入
ta blog去到我的 blog session。 - 如果還沒有此 session,就用
tat blog創建一個 blog session。 - 或是如果過去有設定過模板,就用
tld blog直接創建已經做好的 blog session。
製作專案 layout
打開空的 session 後:
cd blog進入專案資料夾。- 輸入
nvim打開我的 neovim 程式編輯器。
- 輸入
prefix + c創建一個新的跟現在同樣路徑的 window。- 輸入
hugo server編譯。
- 輸入
- 用
prefix + |在右邊開啟一個新的 pane。- 輸入
ranger來拖曳檔案。
- 輸入
編輯專案
在主要 window 編輯到一半需要把圖片拖曳到我的 hugo 專案時:
- 用
prefix + Tab換到另一個 window。 - 用
prefix + l切換到ranger那個 pane。 - 用
prefix + z讓ranger變成全螢幕。 - 在
ranger裡面把圖片從桌面移到 hugo 專案。 - 用
prefix + Tab回到主要編輯器。
保存專案
- 要把這個 session 保存,就用
tmsv.sh blog存在tmuxp裡面。 - 之後如果電腦關機,就可以用
tld blog重新打開這個 session layout。
刪除專案
- 用
tk blog刪除這個 session。
在專案裡面要打開新專案
- 用
prefix + d回到原始 Terminal。 - 用
tat new-session/tld new-session打開新的專案。
在不同專案之間切換
- 用
prefix + s/prefix + w打開 session list 或 window list。 - 用
h, j, k, l選擇要打開的 session 或 window。